Monday, April 8, 2024

The Eclipse and I

No, I'm not talking about the 2024 eclipse that would have required us to travel long distances to areas of intense price-gouging, with no money-back guarantees if the sky chooses to cloud over.

I am talking about the one that practically landed in my backyard.  

It was 2017 and our property here in the high desert of Central Oregon had a large excavated spot where our house would soon be.  We were living a few hundred feet away in our motorhome.  

The epicenter, AKA Ground Zero, AKA the PLACE TO BE ..... for this eclipse was proclaimed to be none other than little Madras, Oregon.  (Population: not a lot)  Why?  Because it was smack dab in the middle of The Path and it's in the desert where the sun usually shines and the sky is clear, right?? .... But what the proclaimers didn't think about was that it was August, also smack dab in the middle of fire season with its ensuing smoke.  Much too common in this part of the world.

Our property is within an hour's drive from Madras and Husband, in full faith, was making plans.  Big plans.  

Included in his vast list of hobbies, is photography ..... especially and almost exclusively taking pictures of anything in space .... planets, stars, galaxies, oddly named things like the "Orion Nebula".  His collection of  telescopes, tripods, camera setups that track planet movement, etc, is ever-growing.  Needless to say, he was determined to photograph every phase of this rare event, come hell or high water. 

Meanwhile, the media, with its constant thirst for viewership, was in full throttle with ominous predictions of what was about to descend upon little Madras and its surrounding communities.  The highways would be bumper-to-bumper, they said.  Food and gas would run out.  Strangers would trample upon private property.  "Human sacrifice!  Dogs and cats living together! Mass hysteria!!"*  In other words, we needed to stock up and hunker down as we awaited the Apocalypse. 

So we did.  Gas tanks were filled (causing some local gas stations to temporarily run out well before any crowds arrived).  Groceries were purchased and No Trespassing signs popped up all around.  

A couple of days before the big weekend, we were about three hours away in western Oregon.  We decided to drive home early in the morning, hoping to be ahead of the east-bound, eclipse-seeking traffic tidal wave.

"Strange", we commented to each other, during that trip.  No traffic.  The towns we passed through as we got closer to home, were eerily empty.  In fact, as we later learned, other than congestion on the main street of Madras (easily avoided by driving one block to a side street), the highways were completely normal.  There were some well-behaved crowds of people camped in and around Madras, but besides that, you'd never know anything was happening.  The only thing close to disastrous that I saw was (and you might want to sit down for this) Dairy Queen ran out of some menu items.  (As it turned out, the overhype of the media scared a lot of people away.)

Meanwhile, back at the ranch as they say .... we woke up that morning to .... you guessed it ..... smoke.  Still hours before start time, we jumped in the car and drove about ten miles, hoping to find blue sky.  Nope.  However, by the time the eclipse began, the smoke cleared.  

Husband was ready.  He had planned this thoroughly.  NASA and/or the Hubble Telescope had nothing on what was going on at our place.  

His cameras were set up on our aforementioned excavated building site, and pointed skyward.  I was enlisted to sit there with my finger poised on a camera push button, and click (take a picture) ... count to six ... click (another picture) ... count to six ... click ... count ... click, until told to stop.  At the same time, he was doing something similar with another camera.  Our bases were covered.  Nothing could go wrong.  We even, as I vaguely recall, rehearsed.  

It began as planned.  We clicked and counted, over and over, as we watched the event unfold.  But then things went awry.  Husband being so excited over what he was seeing, suddenly exclaimed,  "OH NO, I lost count!"  "I messed up!"  (Or something like that.)  

"I'm clicking!  I'm doing it!" I protested.  But frustration and disappointment replaced the excitement as Husband fretted about failing.  

After it ended, I walked quietly back to the motorhome.  It didn't help when all the Facebook photos began to pop up online by friends who had had happy social gatherings, sitting together and enjoying the eclipse .... noticing odd shadows, animal reactions, or whatever is supposed to accompany this rare phenomenon.  

That said, the photos turned out beautifully, all was well, and lessons were learned .... meaning, if I ever experience another eclipse, I will do nothing but sit with my funny little cardboard glasses ..... and watch.  


(The Orion Nebula)


*Ghostbusters 


Tuesday, December 6, 2022

A Christmas debate and another project

Having lived in NW Oregon most of my life, I was firmly in the Must-Have-A-Real-Christmas-Tree camp.  When one is literally surrounded by tree farms full of reasonably priced, fresh, green trees, how could one not be?  (Just my own biased and tainted opinion.  This is an all-inclusive, multi-diversity blog.  In other words, don't hate me.)

Now, it must be said about my childhood in the 1950s and 60s, naturally gangly and misshapen evergreens, with open branches that we drowned in silver tinsel, was the norm.  They were truly something to behold, and we loved them.

Don't laugh.

Nowadays, trees are trimmed into awful gumdrop-shaped bushes in which you have to search to find the trunk.   But no doubt, each generation believes theirs is/was The Best, so I will concede that, maybe, the trees of MY childhood don't appeal to all.  (And they would be wrong.)

Then in my adult years, I determined that pre-cut trees sold in the local hardware store parking lot, aren't always as fresh as they appear.  And when you have a wood stove in the vicinity of where you plan to put your tree, starting out with FRESH is quite important.  So for many years, we trudged out into the wet December weather, to one of the many local farms and cut our own because, darn it, we were die-hard Oregonians and that is simply how it's done.  

Then we moved to the desert.  

Cut trees are trucked in (from somewhere) to be sold and hence, in my mind, they've probably already started dropping their needles ..... not unlike Charlie Brown’s sad little twig-tree.  Plus we again have a wood stove to suck any remaining moisture out of whatever we haul home.  

So 'twas time to buy our first fake tree .... which I found online.  

(Side Note:  I now realize that many people here are the real deal because they venture out into actual woods, in actual snow, in actual mountains, and cut down a wild tree.  No pre-cut lots or farms for them.  THAT is how it all began before even MY childhood, and deserves the full admiration and respect of all Christmas tree purists.)

It arrived wedged inside a large box that it would never again fit into .... and I tolerated it.

Not that the tree wasn't pretty.  It definitely was.  But I soon realized that fake trees have one BIG drawback, which is ..... eleven months of the year it must be stored ..... somewhere.  

When we were planning to build our house, a friend advised that we should include in our design, a large closet into which we could roll a Christmas tree, fully upright and decorated, where it could remain untouched until we wheeled it out again the next December.  This friend, I've decided, was very wise.   But since I failed to heed this advice, I instead bought a bright red tree bag that was big enough to hold a couple of adults and their pet German Shepherd.  It hung on large hooks up in our garage and looked like a garish, yet festive, cadaver bag clinging to the wall.  

I ended up selling that tree to a friend who has more storage space than I do, and proceeded to Plan B.

Probably over a decade ago when Pinterest entered my life, I saved an enchanting picture of a homemade Christmas "tree".  It was a lovely way to display a Christmas village.  I vacillated over making one for years.

I already had nine little village buildings, purchased many years previous.  A start.  Then my daughter caught hold of the idea and found several more pieces that matched my set which, as far as I know, are not made anymore, sending us to resale shops, garage sales, and eBay.

"Mom!", she'd phone.  "I found five.  How many do you want?"  

Then I scored at a garage sale and ended up with a total of 23.   There was no turning back now.  

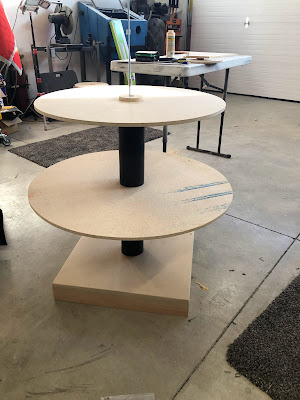
So with Husband's clever mind for engineering and function, we came up with our design .... 


Beginning with the base, he made a sturdy wooden box 24"x24" square, and 4" high, with a 4.5" hole in the center to fit the "trunk".

Upside down.

Note the small circle piece below the hole, and the tiny hole in its center.

Using plastic ABS pipe, he cut six pieces.  The bottom piece of pipe has a diameter of 4.5", and is 18" long.  The next four pieces are each 12.5" long.  From the bottom up, the pipe diameters are 4.5", 4.5", 3.5", and 2.5", so that the "trunk" will grow progressively narrower from the bottom to the top.  The top piece of pipe is 1" diameter and 8" long.

Now for the "branches".   From a sheet of 1/2" chipboard plywood, we cut five circles with diameters of 36", 30", 24", 18", and 12".   He cut a 2" hole* in the center of each.

*The holes in the center of each wooden circle were originally cut too small, hindering all the cords and plugs needing to pass through.  So they were expanded to 2".

He cut small (1/2” thick) circles that glued onto the centers of both sides of the large circles, with the holes lined up.  Each small circle was cut to fit snuggly into the "trunk" pipe, as shown above.  This "trunk" is the conduit for all the electrical cords.  At the base of each pipe section (except the bottom one), he cut a hole about 1"x2", for the electrical cords to enter and exit.   I positioned these holes in the back side of the tree so they don't show.


Husband used a threaded 1/4" steel rod .....


.... and connected several lengths together with these.


The rod goes from that tiny hole in the base, up through the "trunk", to the top circle of the tree where it is all tightened down with a nut at each end.

After sanding all the wood, I painted everything white.

Assembling the whole thing was much easier in theory, than in actuality.  It would be an understatement to say it was challenging to run the cords through the holes and pipe while at the same time fitting together the "trunk" pieces and wooden circles, from the bottom upward.  Especially when Husband was at a meeting and I was flying solo at this point.  There were a few cuss words and the ceiling fan turned to full speed to keep from sweating to death in the process.  Then I decided it was too tall and had to be taken apart so I could cut an inch out of each "trunk" section and the building process began anew with more sweating and cussing.   

Walmart was a big help by only being 20 minutes away and by stocking short lengths of twinkle lights and inexpensive power strips, of which I used four.   

After the main assembly was complete, I cut a bunch of pieces of 2" styrofoam (upon which the village buildings would sit) and draped them all with quilt batting to create hills of "snow".  The styrofoam and batting helped to hide the myriad of cords underneath.

That threaded rod emerged from the top circle, tall enough to stick on that last piece of 1" diameter pipe which holds the star.  

Finally, around the outer edge of each circle, I screwed in 40 small metal hooks, about 9-10" apart.  These hold the garland and twinkle lights. 

 (By the way, the garland was purchased probably 30 years ago at Costco and it was the exact amount needed.  ‘Tis the season of miracles.)

And this was the result .....

(Not quite as grand as the one from Pinterest, but pretty enough.)  It measures approximately 7.5' tall from the floor to the top of the star.


I'm not happy with the trunk because it looks exactly like what it is .... painted plastic pipe.  So next year I plan to cover it, or paint it differently ..... or something.  We'll see.  But for now, it ain't coming apart till January.  

Now for the best part:  It will all disassemble and store compactly in the garage.  

And no more gigantic body bags.


* Merry Christmas *


Saturday, November 12, 2022

Latest project and the how-to


When we built our house, we kept things to a minimum.  Now and then I regret this decision because with the latest influx of grandkids (12.5 at last count), we no longer all fit here.  Alas.  Not that our house is small, it's just not big.  Thus organization is a must, which segues nicely to a recent project--

My Sewing Cabinet

I do not have a dedicated sewing room.  Instead, my sewing machine has occupied a spot on a small desk in one of our guest bedrooms. Visually, this isn't optimum when an overnight guest is on the premises.  So I came up with an idea.  (Unfortunately I didn't think of blogging about this until it was finished, so I can't show all the steps.  But it's pretty simple.)

Step #1:  Find a used TV armoire.  I found this on Facebook Marketplace for $40.


Step #2:  Remove all hardware and try not to lose any of it.  Then remove the doors and don't lose them either.

Step #3:  Thoroughly "buff" the entire surface with something like this gritty, scrubby material (not to be confused with those green scrub pads that you clean your pots and pans with) ....

.... to remove the glossy finish, because if you're foolish like me, you are wanting to paint it.  

Step #4:  (Here's where things went south for a while, so avoid following my example on this step.)  Let me just say .... choose your paint carefully.  Do not cut corners here.  Don't believe the internet when it tells you to use an oil-base enamel paint.  Don't use leftover paint that's been languishing for a few years on a shelf in your garage.  If you happen to have a paint sprayer, don't use it on a hot day.  Get yourself a small can of some good semi-gloss, water-base cabinet/trim paint.

Trust me on this so that, hopefully, you will not have to re-sand and repaint FOUR times.  I am not kidding.  Then, after you have all this figured out .... paint the darn thing.

Step #5:  Somehow insert entire armoire into your house without gouging any walls or door frames.

Step #6:  Reattach all hardware and doors because you did not lose them, right?!?  

Here's where it starts to get fun .....

Step #7:  I made a panel to cover the interior back wall, out of a cut-to-fit sheet of 1/4" hardboard, covered with 1/4" foam, and fabric, using spray glue and a hot glue gun.  You can find the foam at JoAnn's and it has the word "naked" in the title.  (I know not why .... )  Fabric stores are limited where I live and for whatever reason, I wanted an old-fashioned, grandma-ish print, which JoAnn's failed to produce.  But good ol' Walmart came through.  This panel was attached with screws.

Step #8:  Build shelves to go into the inside upper portion of the cabinet and above all, do NOT injure yourself with any power tools especially if your spouse/partner has gone fishing and is not home.  Paint and install.

Step #9:  Install light fixture and power strip.  

Step #10:  Enlist husband (or anyone handy) to design/build a shelf, upon which your sewing machine will sit.  Sand and stain (or paint).  Then reenlist same husband/handy-person to mount it on heavy-duty drawer slides.  (Warning, these slides are more expensive than you'd think.)  This shelf, when installed, should sit about 30" from the floor, which is the standard height of a desk or table.

Step #11:  Accessorize.  I installed spool racks which were also unexpectedly pricey considering I gave some away during our last move.  I bought the small wall-mount spice rack at Home Goods several years ago .... as I recall.  Finally, trot on over to Dollar Tree for some inexpensive baskets.

Step #12:  Step back and admire.

One of my worries was that this very tall black cabinet might overwhelm the room or frighten various wee grandkids trying to sleep nearby.  But after moving it in, the room is fine .... and I think all visiting wee grandkids will be as well.

Ta-Da!

I didn't turn the light on inside because in the photo it caused a glare.


Oh yes .... I found these large cat litter bins that fit perfectly on the lower shelves, to hold fabric scraps.


And in another corner, a rocking chair that was successfully painted on the first try!

I'll go ahead and show the rest of the room, because it's cute.  By the way, that table was a $3 find at Goodwill.  It actually came that color!  Everything else in this room (except bed, bedding and curtains and that curly thing above the bed that I found at Hobby Lobby) came from garage sales.