Having lived in NW Oregon most of my life, I was firmly in the Must-Have-A-Real-Christmas-Tree camp. When one is literally surrounded by tree farms full of reasonably priced, fresh, green trees, how could one not be? (Just my own biased and tainted opinion. This is an all-inclusive, multi-diversity blog. In other words, don't hate me.)
Now, it must be said about my childhood in the 1950s and 60s, naturally gangly and misshapen evergreens, with open branches that we drowned in silver tinsel, was the norm. They were truly something to behold, and we loved them.
 |
| Don't laugh. |
Nowadays, trees are trimmed into awful gumdrop-shaped bushes in which you have to search to find the trunk. But no doubt, each generation believes theirs is/was The Best, so I will concede that, maybe, the trees of MY childhood don't appeal to all. (And they would be wrong.)
Then in my adult years, I determined that pre-cut trees sold in the local hardware store parking lot, aren't always as fresh as they appear. And when you have a wood stove in the vicinity of where you plan to put your tree, starting out with FRESH is quite important. So for many years, we trudged out into the wet December weather, to one of the many local farms and cut our own because, darn it, we were die-hard Oregonians and that is simply how it's done.
Then we moved to the desert.
Cut trees are trucked in (from somewhere) to be sold and hence, in my mind, they've probably already started dropping their needles ..... not unlike Charlie Brown’s sad little twig-tree. Plus we again have a wood stove to suck any remaining moisture out of whatever we haul home.
So 'twas time to buy our first fake tree .... which I found online.
(Side Note: I now realize that many people here are the real deal because they venture out into actual woods, in actual snow, in actual mountains, and cut down a wild tree. No pre-cut lots or farms for them. THAT is how it all began before even MY childhood, and deserves the full admiration and respect of all Christmas tree purists.)
It arrived wedged inside a large box that it would never again fit into .... and I tolerated it.
Not that the tree wasn't pretty. It definitely was. But I soon realized that fake trees have one BIG drawback, which is ..... eleven months of the year it must be stored ..... somewhere.
When we were planning to build our house, a friend advised that we should include in our design, a large closet into which we could roll a Christmas tree, fully upright and decorated, where it could remain untouched until we wheeled it out again the next December. This friend, I've decided, was very wise. But since I failed to heed this advice, I instead bought a bright red tree bag that was big enough to hold a couple of adults and their pet German Shepherd. It hung on large hooks up in our garage and looked like a garish, yet festive, cadaver bag clinging to the wall.
I ended up selling that tree to a friend who has more storage space than I do, and proceeded to Plan B.
Probably over a decade ago when Pinterest entered my life, I saved an enchanting picture of a homemade Christmas "tree". It was a lovely way to display a Christmas village. I vacillated over making one for years.

I already had nine little village buildings, purchased many years previous. A start. Then my daughter caught hold of the idea and found several more pieces that matched my set which, as far as I know, are not made anymore, sending us to resale shops, garage sales, and eBay.
"Mom!", she'd phone. "I found five. How many do you want?"
Then I scored at a garage sale and ended up with a total of 23. There was no turning back now.
So with Husband's clever mind for engineering and function, we came up with our design ....
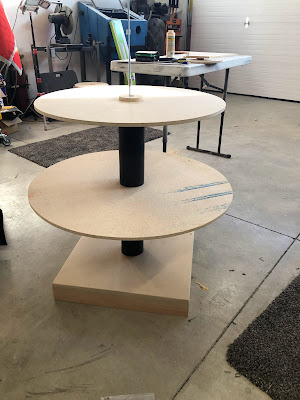
Beginning with the base, he made a sturdy wooden box 24"x24" square, and 4" high, with a 4.5" hole in the center to fit the "trunk".
 |
| Upside down. |
 |
| Note the small circle piece below the hole, and the tiny hole in its center. |
Using plastic ABS pipe, he cut six pieces. The bottom piece of pipe has a diameter of 4.5", and is 18" long. The next four pieces are each 12.5" long. From the bottom up, the pipe diameters are 4.5", 4.5", 3.5", and 2.5", so that the "trunk" will grow progressively narrower from the bottom to the top. The top piece of pipe is 1" diameter and 8" long.
Now for the "branches". From a sheet of 1/2" chipboard plywood, we cut five circles with diameters of 36", 30", 24", 18", and 12". He cut a 2" hole* in the center of each.
 |
| *The holes in the center of each wooden circle were originally cut too small, hindering all the cords and plugs needing to pass through. So they were expanded to 2". |
He cut small (1/2” thick) circles that glued onto the centers of both sides of the large circles, with the holes lined up. Each small circle was cut to fit snuggly into the "trunk" pipe, as shown above. This "trunk" is the conduit for all the electrical cords. At the base of each pipe section (except the bottom one), he cut a hole about 1"x2", for the electrical cords to enter and exit. I positioned these holes in the back side of the tree so they don't show.
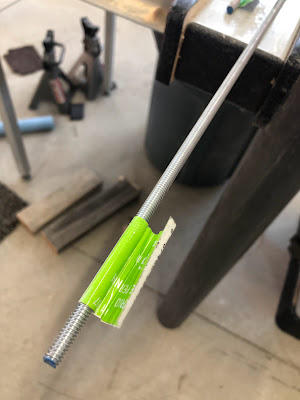
Husband used a threaded 1/4" steel rod .....
The rod goes from that tiny hole in the base, up through the "trunk", to the top circle of the tree where it is all tightened down with a nut at each end.
After sanding all the wood, I painted everything white.
Assembling the whole thing was much easier in theory, than in actuality. It would be an understatement to say it was challenging to run the cords through the holes and pipe while at the same time fitting together the "trunk" pieces and wooden circles, from the bottom upward. Especially when Husband was at a meeting and I was flying solo at this point. There were a few cuss words and the ceiling fan turned to full speed to keep from sweating to death in the process. Then I decided it was too tall and had to be taken apart so I could cut an inch out of each "trunk" section and the building process began anew with more sweating and cussing.
Walmart was a big help by only being 20 minutes away and by stocking short lengths of twinkle lights and inexpensive power strips, of which I used four.
After the main assembly was complete, I cut a bunch of pieces of 2" styrofoam (upon which the village buildings would sit) and draped them all with quilt batting to create hills of "snow". The styrofoam and batting helped to hide the myriad of cords underneath.
That threaded rod emerged from the top circle, tall enough to stick on that last piece of 1" diameter pipe which holds the star.
Finally, around the outer edge of each circle, I screwed in 40 small metal hooks, about 9-10" apart. These hold the garland and twinkle lights.
(By the way, the garland was purchased probably 30 years ago at Costco and it was the exact amount needed. ‘Tis the season of miracles.)
And this was the result .....
(Not quite as grand as the one from Pinterest, but pretty enough.) It measures approximately 7.5' tall from the floor to the top of the star.
 |
  |
I'm not happy with the trunk because it looks exactly like what it is .... painted plastic pipe. So next year I plan to cover it, or paint it differently ..... or something. We'll see. But for now, it ain't coming apart till January.
Now for the best part: It will all disassemble and store compactly in the garage.
And no more gigantic body bags.
* Merry Christmas *


